Documentation
# Overview
SG Widget is an email collection form that can be installed on any HTML website. Once in place, users will be able to add their email address and join your mailing list.
It's a layer between your website and Sendgrid. There is no official Subscription Widget from Sendgrid so SG Widget solves the problem with a highly configurable solution in the middle.
SG Widget requires permission to add emails to your Sendgrid account so it needs to be linked with a API token generated from the Sendgrid backend.
Requirements
- A Sendgrid account
- A HTML website. SG Widget doesn’t work with Single Page Apps
# Account Setup
Setting up your SG Widget account is quick and easy by following a few simple steps.
Create Account
Before getting started with SG Widget you need to create an account. Click here to open the registration page. All accounts come with a 14 day completely free trial.
Logging In
If you already have an account you can log in to the SG Widget backend by clicking Login on the homepage or clicking here.
Link to Sendgrid with API Key
Once your account is created, it needs to be linked to Sendgrid so that when a user enters their email address, SG Widget is able to communicate with your Sendgrid account and add the email address to your chosen list.
You should create a Restricted API Key that has full Mail Send and Marketing Campaigns access. If you want to use custom email templates using Sendgrid's Transactional Templates feature, then add Template Engine Read Access privileges to the API key also.
SG Widget treats security with the highest grade of importance. Your API key will be encrypted in our system so it cannot be exploited even if someone wanted to. If you are still concerned about using your API Key in our application, check out this blog post that explains the steps we take to keep things secure.
- Click here to open the SendGrid API Keys panel.
- Click > Create API Key
- Select Restricted Access and grant access to Mail Send and Marketing Campaigns. If you want to use custom email templates add Template Engine Read Access privileges
- Scroll to the bottom and click > Create & View
- Copy the generated code ----
- Go back to SG Widget
- Open the settings page by clicking your profile icon > Your Settings > Profile
- Paste the key into the Sendgrid API Keys section
- Click Save
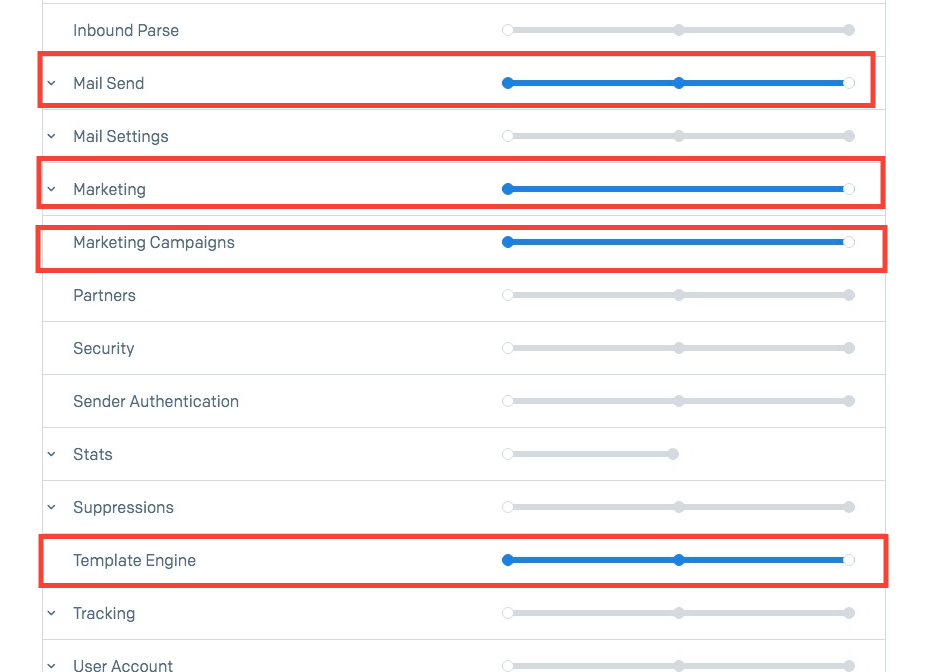
Your SG Widget account will now be successfully linked to Sendgrid.
Sendgrid Marketing Campaigns Version
SG Widget connects to Sendgrid Marketing Campaigns. They deployed a new version of their Marketing Campaigns with Automation in July 2019 and currently offer an API for both versions.
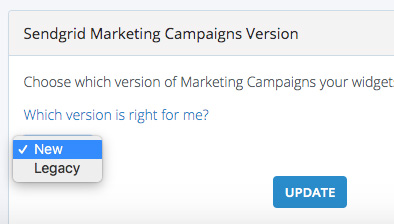
SG Widget also supports both versions by allowing you to choose which one you want to connect to depending on where your data is stored.
Legacy Version
If you signed up to Sendgrid before July 2019 you will have access to both new and legacy versions of Marketing Campaigns. If so, you will see two Marketing links in the sidebar of your Sendgrid account.
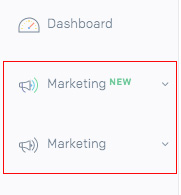
By default your data will be stored in the legacy version unless you have migrated it so you should select ‘legacy’ in SG Widget.
- Go to Settings
- Select Legacy
- Click Update
New Version
If you signed up to Sendgrid after July 2019, the new version with automation will be the only version you have access to in your Sendgrid account. You will only see one marketing link item in the sidebar with a New flag.
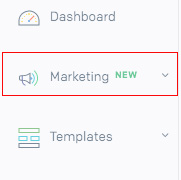
When choosing your marketing campaigns version in SG Widget, you should choose ‘new’.
- Go to Settings
- Select New
- Click Update
Changing Versions
If you wish to change the version that SG Widget points to, simply select the alternative item from the the settings page of your SG Widget account.
Changing versions will break widgets pointing to a list in the previous version of Marketing Campaigns so you will have to edit your widgets to connect to a list in the updated version.
# Create Widget
After your account is linked to Sendgrid, you can create your first widget in the SG Widget backend. Each widget has its own unique snippet of code. This is what links your SG Widget account to your desired Sendgrid list.
Click the Create Widget button on the dashboard.
Choose Sendgrid List
SG Widget automatically detects your existing Sendgrid lists and displays them in a dropdown. Choose which list the widget should be linked to.
If you do not have any Sendgrid lists yet, a form will be displayed that allows you to create them directly from the SG Widget backend.
Whitelist URL
This is the URL of the website the widget will be hosted on. If your domain is called example.com, enter the full URL and protocol such as https://www.example.com.
SG Widget will only work on whitelisted domains. If you enter mysite.com when the website is called example.com, requests will fail.
Name field
Decide whether to show the name field or not. If checked, fields will be shown on your widget for users to enter their first and last names.
Consent Checkbox
Decide whether to show a consent checkbox. If set, a checkbox will be shown under the widget with a short snippet of text. Users must tick the checkbox before being allowed to submit the form.
Double Opt In
Decide whether to enable Double Opt In. If set, when a user completes the form, they will receive an email that contains a link they must click before being added to your list. This improves list quality and is recommended.
With all of these options chosen, click > Create.
# Additional Configuration
Additional configuration options are available beyond what is shown on the create widget form.
The widget details page shows the currently active options for the widget. You can change these by clicking edit in the top right corner.
Label
A descriptive tag to help you differentiate between widgets in your SG Widget dashboard. It is not shown to your end users.
Dev URL
A secondary whitelisted URL that the widget can be placed on, e.g http://localhost.
This is commonly used to verify the widget is working on development or staging sites before deploying to production.
Error Message
Feedback text shown to users when there is any kind of error on the form. Default values are supplied.
Email From Name
The name displayed as the sender when a user receives a Subscription Confirmed for Double Opt-In email. Defaults to 'SW Widget HQ'
Email From Email
The email address displayed as the sender when a user receives a Subscription Confirmed for Double Opt-In email. Defaults to the current user email address.
Include Name Field
If checked, a field will be added to the form requiring the user to enter their first and last name. These will be stored in Sendgrid and can be useful if you want to send personalized email campaigns in the future.
Bcc notification email
Email address that is notified when a user subscribes through a widget. This is ideal for integrating with another tool or system in your pipeline.
Opt In Type
SG Widget supports two opt in types - single and double. These determine what happens when a user enters their email address and clicks submit.
Single Opt In
With Single Opt In, users are immediately added to your list without having to confirm their email address. This is the fastest sign up method but can lead to fake email addresses and less engaged users on your list.
Options:
Success Message
The message shown to users after they enter their email address and are successfully subscribed to your list. A default value is used if none is set.
Success Redirect URL
If entered, this is the URL users are redirected to after they are successfully subscribed. This is usually a Thank You or Subscription confirmed page on your site but can be any URL on the internet.
Double Opt In
With Double Opt In, users receive an email after they click submit. They must open this email and click the link it contains before they are subscribed to your list. Double Opt In is useful for improving your list quality and nurturing a higher quality user base. Read more about SG Widget and Double Opt.
You can choose to send Doule Opt In emails using the default SG Widget template or a custom one that you have defined in Sendgrid’s Transactional Templates area.
Template Options:
Default
Message shown to users when they click submit advising them to check their inbox. A default value is used if none is set.
From NameThe name that appears as the sender in the email that users receive.
From EmailThe email address that appears as the sender in the email that users receive
SubjectThe subject of the email that users receive. A default value is used if none is set.
Body TextThe main body text of the email that users receive. A default value is used if none is set. HTML can be used.
Button TextThe text used on the button inside the email that users must click. A default value is used if none is set.
Success Redirect URLIf set, this is the URL users are redirected to after they click the link in the email and are successfully subscribed. This is usually a Thank You or Subscription confirmed page on your site but can be any URL on the internet. If none is set, users will see a default SG Widget page confirming their subscription.
Custom Template
If you prefer to have total control over the look and feel of the email, you can create a custom template in Sendgrid, which can then be activated in your widget settings.
If you haven't created a template in Sendgrid yet, follow our instructions.
Welcome Email
Subscribers can receive a welcome email once they have gone through the signup steps and successfully joined your list. When activated, welcome emails will be sent for both Single and Double Opt-in requests.
Template Type
You can choose to send emails using the default SG Widget template or a custom one that you have defined in Sendgrid’s Transactional Templates area.
Template Options:
Default
- For template type, select the SG Widget Default option.
It has two configuration settings:
Subject
Subject of the email that subscribers receive. Defaults to 'Subscription Confirmed'
Body Text
The content of the email that the user receives. A default message is used. HTML can be used.
Custom Template
If you prefer to have total control over the look and feel of the email, you can create a custom template in Sendgrid, which can then be activated in your widget settings.
If you haven't created a template in Sendgrid yet, follow our instructions.
- For template type, select the Custom option.
- Choose the desired template from the dropdown
- Click Update
Consent Checkbox
Widgets can contain a small checkbox on the front end that users must tick to acknowledge the websites terms and conditions before the form is submitted.
Options:
Display Text
The text shown beside the checkbox. A default value is used if none is set.
Link URL
The URL of the link in the text. This is usually the URL of the websites privacy policy.
Link Anchor Text
The text shown for the link specified above. Opens in a new tab.
Language
All of the text fields of SG Widget are given default English values. You are free to change these to whatever you want - in any language. This gives you the freedom to use SG Widget on any website in multiple languages.
Custom Email Templates (Plus and Pro Plans)
SG Widget integrates with Sendgrid’s Transactional Templates feature enabling you to create custom email templates that can be designed to your preferences instead of using the default SG Widget versions.

- Open the Transactional Templates section of your Sendgrid Account
- Click Create Template
- Add a name in the dialogue box and click Save
- Open the Actions drop-down menu to create a new version
- Click Add Version
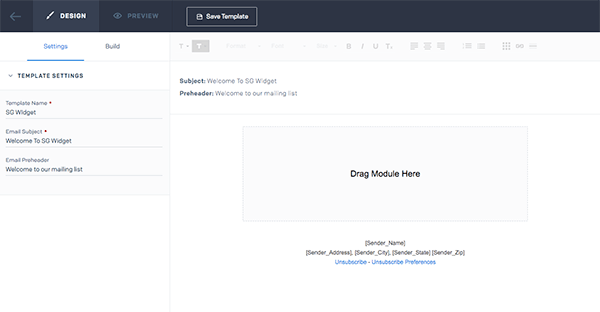
- The editor will open allowing you to customize the subject and the body of your email template
- Before saving, making sure the template contains an unsubscribe link. This can be added by the Unsubscribe module if not already in place
- SG Widget will now be able to access these templates when you are configuring the email options on your edit widget page
Name Placeholders
If you have fields for first name and/or last name on your form, you should add placeholders for first name and/or last name to your template. These should be inside curly braces like this:
{{first_name}}
{{last_name}}
Confirmation Link
Double Opt In emails must contain a clickable link for users to confirm their subscription.
The link is dynamic for each user so when designing your template, it must contain a placeholder that will be populated with a URL by SG Widget during sending. The placeholder should be the text ‘link’ inside double curly braces like this:
{{link}}
It should be used as the href of an anchor tag like so:
See the Pen yQjQaM by Paddy (@paddys_1) on CodePen.
Once you've created your Double Opt In Template with a link placeholder, go back to the SG Widget edit page and in the Double Opt In Section:
- For template type, select the Custom option.
- Choose the desired template from the dropdown
- Click Update
Custom Form Fields (Plus and Pro Plans)
SG Widget makes it extremely simple to add custom form fields for collecting additional information on your subscription widget. These integrate with Sendgrid's Custom Fields feature so that any custom field you create in a widget maps directly to the corresponding custom field in Sendgrid when a user clicks submit on your website.
Within SG Widget you can create a custom form field from any of the following HTML input types:
- text
- number
- tel
- checkbox
- select(dropdown)
- hidden
Enabling Custom Fields
- Check the Custom Fields checkbox on the edit page of your widget
- Click + Add New
- Set the desired field options
- Click Update
- Copy and paste the generated source into your website code

The values collected in these custom fields will then be displayed in the contacts of your Sendgrid list.
Checkboxes
Sendgrid doesn’t support checkboxes as custom fields but SG Widget offers a way to enable them. Using our API we convert checkbox fields to text during the submission process, the values of which are stored as yes/no after the data is posted to Sendgrid.
To utilize this make sure the set the custom field as a text field in Sendgrid.
ID's
Each custom field will have an ID in the generated source that can be targeted with CSS or JavaScript. It will have the pattern sg_custom_*. For example:
id="sg_custom_0"
id="sg_custom_1"
Hidden Fields
Hidden fields allow you to capture data programmatically and have this submitted when a user clicks subscribe. For example, you could have some code that works out the users IP address and appends this to a hidden field.
To append data to a hidden fields, just set the value of the hidden input. Here is one method using JavaScript:
document.getElementById("custom_field_id").value = "My value";
Subuser Access (Plus and Pro Plans)
You can access the lists of subusers from SG Widget. This allows you to create a widget that integrates with a list in a subuser account.
- Open the parent API Key in your Sendgrid account.
- Give it full Subusers permissions

- When creating or editing a widget, choose a sub user list in the list selection dropdown
- A link to your widget can be found on the dashboard
- Click View on the desired item to open the Widget Detail page
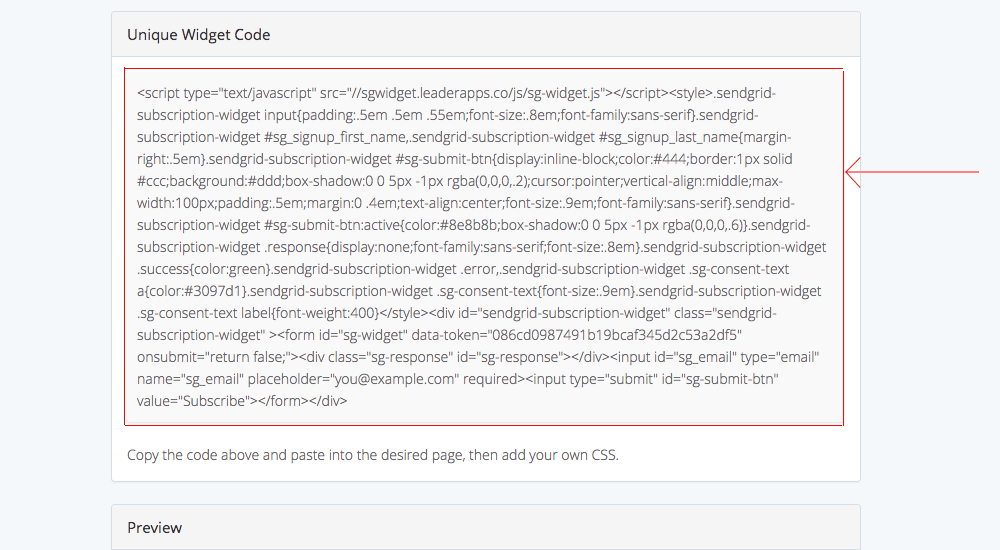
- Scroll to the section titled Unique Widget Code
- Copy the entire block of HTML
- Open the source code of your website in a text editor
- Paste the HTML. There is no need to modify the code, and you can copy and paste it directly into your codebase as it is.
- Go to your Wordpress codebase
- Open the functions.php file, located at /wp-content/themes/yourtheme/
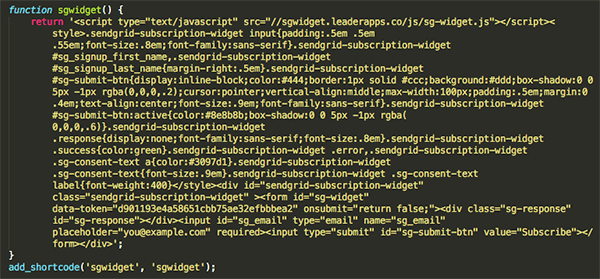
- Create a shortcode
- Paste the snippet from SG Widget into the shortcode. See below for reference:
- Upload functions.php to your server
- Login into your Wordpress Admin panel
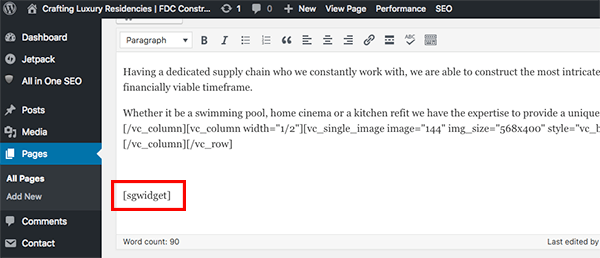
- Call the shortcode wherever you want it to display
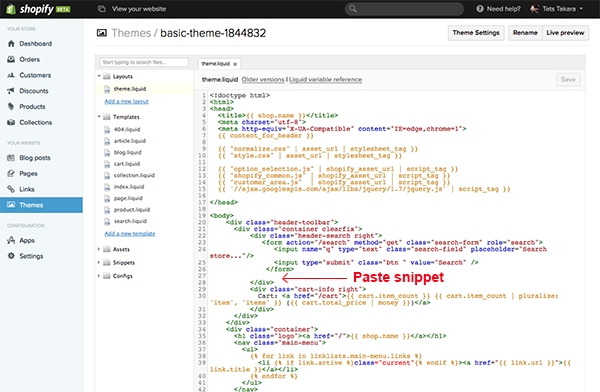
- From your Shopify admin, go to Online Store > Themes
- Click Actions > Edit code
- Click a file in the directory on the left to open it in the code editor
- Paste the snippet from SG Widget into the desired location
- Click Save
- Name Field
- Consent Checkbox
- Display Text
- Link URL
- Link Anchor Text
- Ensure the domain specified in the widget settings matches your website address exactly including http/https. For clarity, copy the URL from the address bar of your browser and paste into the widget settings
- Make sure there are no console errors on page load or after clicking submit
- Verify your API Key is correct and has Marketing Campaigns access
- Check whether you have exceeded your Sendgrid monthly allowance
# Installing On A Website
Once a widget is created and the options have been defined, it can be added to the website specified in the Domain or Dev URL fields.
Locating Your Widget Code
Paste Into Website
The widget can be installed anywhere on a site. There are no requirements to put it before the closing head tag or after the opening body tag. We are waaay to flexible to impose those restrictions on developers!
Custom website
Wordpress
Shopify
Styling
SG Widget comes with minimalist default styling. The CSS is inlined into a style tag within the code chunk that is copied from the SG Widget backend. You can edit this directly or you can remove it and place your own styles into the CSS file of your website. Remember not to change the ID’s or Classes in the HTML as these are required by the Javascript to read the values from the form when users click submit.
# Updates
There are two types of updates that can happen with SG Widget:
Settings
When you change the settings of an existing Widget, it performs differently than before. Some of these edits may generate a new version of the HTML snippet that needs to be installed on your website again.
For example, if you didn’t have the name field enabled and decide to turn it on at a later date, the HTML of your widget would change and you would have to copy the newly generated snippet into your website. If this happens, you will see a message when you click Update that tells you whether a new version of the snippet was generated. It looks like this:

Here is list of the settings that when changed will alter the HTML and require you to add a new version of the snippet to your site:
All other changes are managed by us and immediately propagate to the front end. For example, if you alter the Error Message or Success Redirect URL, these do not change the HTML and are immediately updated in our database so are shown to users without having to add a fresh snippet to your website.
Security and Maintenance
SG Widget is a hosted solution, which means we handle all of the maintenance and security updates on our side with zero downtime for users.
Any updates or new features launched will immediately become available to users.
# Troubleshooting
The widget should start working immediately. There is no wait or propagation time. To test it, enter an email address and click submit.
SG Widget will process the email address immediately but it can be up to five minutes before it shows up in the Sendgrid list. This is a limitation on the Sendgrid side. Wait a few minutes and then check the list. If the email still hasn't appeared up try some of the steps below:
# Tips & Frequently Asked Questions
I’m still having trouble installing my snippet.
We would love to help you! Contact us and let us know how we can help.
Can I use the same widget snippet across multiple domains?
No! Each widget works on a single website
How can I remove "via sendgrid.net" from emails?
You need to setup domain authentication for the sending domain. Domain Authentication is what allows SendGrid to send mail on behalf of your domain instead of having it show that it was sent "via sendgrid.net".
For example, if you are sending double opt in emails from [email protected] then you need domain authentication enabled for mywebsite.com.
Go to your Sendgrid account in Settings > Sender Authentication and follow the instructions for Domain Authentication. If you'd like more detail on this, check out this documentation.
My emails are not being delivered or going to the promotions foldeer. What can I do?
Enable domain authentication from your Sendgrid Account to improve deliverability.

