Updated Aug 03, 2024
- SG Widget supports adding unsubscribe links to Sendgrid Emails
- There are two types of unsubscribe - Global and Group
By landing on this article, you are most likely a SendGrid customer looking to add a SendGrid Unsubscribe Link to your emails but are having trouble figuring out how to do it within the their backend or are confused by the documentation they’ve published.
Adding unsubscribe links is an important part of every email you send. Since GDPR, it is now a regulation that you must comply with. If you send emails to users, recipients must have a way to remove themselves from the list - simple. Many things about GDPR are open to interpretation but this is one area that is crystal clear.
As SG Widget is the number one subscription widget for Sendgrid, we know their API and user interface in great detail so we can provide expert advice on how to insert those all-important unsubscribe links and the configuration options you have.
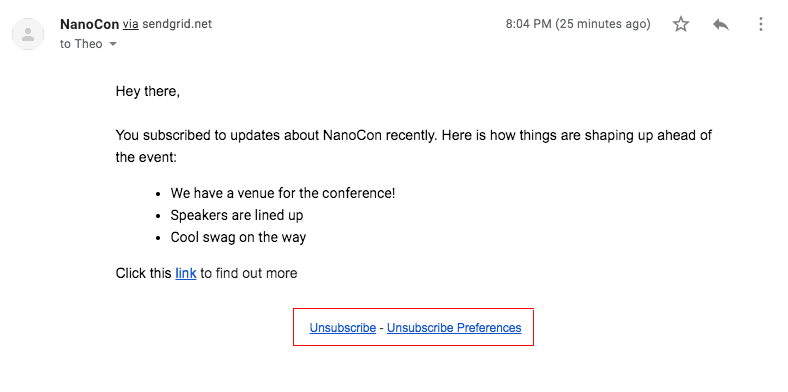
If you want unsubscribe links in your Sendgrid emails just like the screenshot below, then read on:
Contents
Global vs Group Unsubscribes
Firstly, an email can contain more than one type of unsubscribe link so it’s important to understand differences or you could inadvertently allow users to exclude themselves from emails that they really need to see.
Global
A global unsubscribe link is one that allows users to remove themselves from every email you send from your Sendgrid account - no exceptions. If an email address exists in any of your Sendgrid lists and a user clicks a global unsubscribe link, they will be excluded from receiving any future emails from you regardless of the list it targets. This is an extremely powerful option but one that should be used with care. Consider the following scenarios:
1) A blogger with multiple blogs
A blogger could have a Wordpress blog about travelling in Asia and a monthly newsletter that is sent to a list in their Sendgrid account. The blogger may also operate a blog about travelling in Australia with an accompanying newsletter. A recipient could click a global unsubscribe link in the Asia travel newsletter because they’ve just got back from a holiday in that country and have no further interest in exploring it.
However, they would also be opted out of the Australia newsletter and any other email sent from that Sendgrid account. This reduces the blogger's ability to cross-sell and the user's ability to receive an email that they may be interested in.
2) An eCommerce store with a newsletter
A Shopify store that uses Sendgrid to send their transactional emails most likely uses Sendgrid for their marketing emails as well. If a user clicks a global unsubscribe in a promotional email there is a good chance they may not receive transactional emails they really need in the future such as a purchase confirmation or delivery notification.
As you can see, global unsubscribes are powerful but should be used with care. Now let’s compare with Group unsubscribe links.
Group
A group unsubscribe link is one that allows users to remove themselves from specific email lists and remain subscribed to others. This gives Sendgrid users and their recipient's much more granularity and control over how marketing preferences are handled. Let consider how global unsubscribes would impact our previous examples:
1) A blogger with multiple blogs
If a blogger has multiple blogs and a user removes themselves from the mailing list of one blog by clicking a group unsubscribe link, they will only be removed from that list and will still remain subscribed to the mailing list of the other blog. This means the blogger could still promote a holiday in Australia even though the user has excluded themselves from the Asia newsletter. The blogger would be happy because they can continue to contact their subscriber and the user would happy because they can still receive information about potential holiday destinations they are interested in.
2) An eCommerce store with a newsletter
If a user clicks a group unsubscribe link in a promotional email from an online store they would be unsubscribed from that list only and would still receive important transactional emails. The store owner would be happy because they can still inform their users about purchases and the customers would be happy because they will receive an email letting them know when their item will be delivered so they can be in the house.
Adding Sendgrid Unsubscribe Links to emails
There are two types of emails that can be sent from Sendgrid - Transactional or Marketing, and each of these has different methods for inserting unsubscribe links.
Transactional Templates
Global Unsubscribe
As previously discussed, there are no genuine reasons to have global unsubscribe links in transactional emails. After all, they are only triggered by user actions like purchasing a product or requesting a password reset so you can be certain that these are emails users want to receive. None the less, if you have a use case that requires global unsubscribe in a transactional email you can do that by using the Sendgrid Subscription tracking feature. In your Sendgrid Account:
- Go to Settings > Subscription tracking
- Activate
Group Unsubscribe
Group unsubscribe links are the best method for inserting unsubscribe functionality in your emails. Before you do that, you need to have groups created in your Sendgrid account so if you haven’t got some already, go to:
Groups > Unsubscribe Groups > Create a group
Next, you need to insert specific tags in your email that are populated when you make an API request to send the email. This request will contain the group that users will be removed from and also the groups that will be displayed if they click the unsubscribe preferences link.
In your Sendgrid Account:
- Go to your template
- Insert an unsubscribe module in an HTML block
- Save
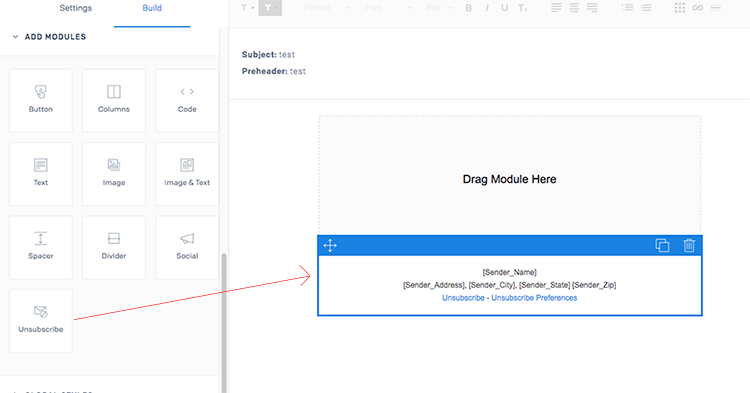
This will insert the required tags that are turned into links when the email is sent.
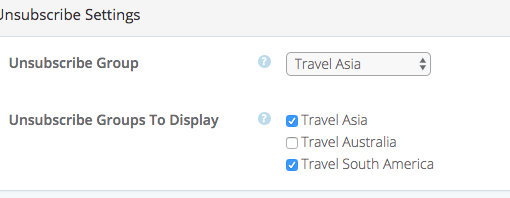
With SG Widget, specifying the groups is easy and requires no coding. In your SG Widget Account:
- Go to the Edit page of a Widget
- Scroll to the Double Opt-In or Welcome Email sections
- Choose an unsubscribe group
- Choose unsubscribe groups to display
- Click Update
Marketing Templates
Global Unsubscribe
As Sendgrid have an intuitive email builder, adding global unsubscribe links to Sendgrid marketing templates is rather straightforward. In your Sendgrid account:
- Go to Templates > Marketing
- Open a template
- Click Tags
- Drag the <%asm_global_unsubscribe_raw_url%> tag into your email
- Save
Group Unsubscribe
Adding a Group Unsubscribe link to a Marketing Template is an identical process, except this time you want to select the <%asm_group_unsubscribe_raw_url%> tag. It couldn’t be easier!
Preferences
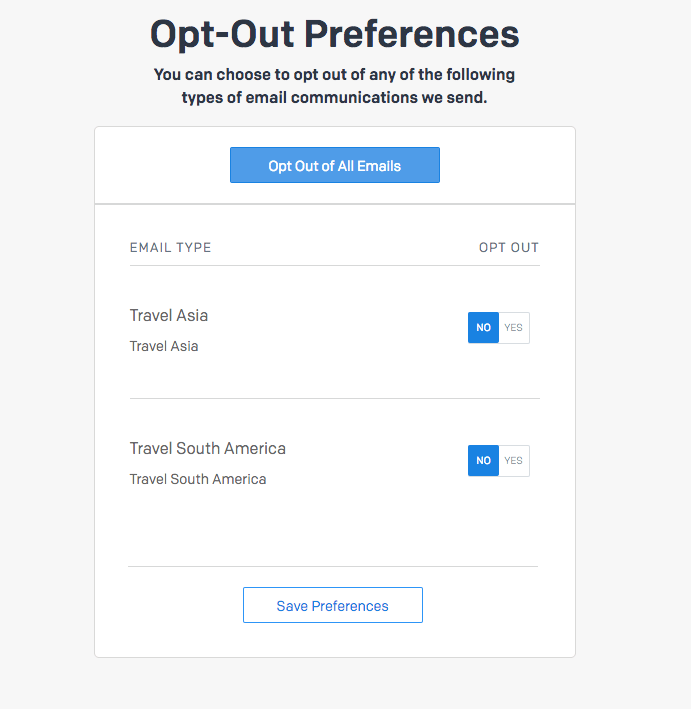
As mentioned, you can give users the ability to alter their subscription preferences from the email by including a preferences tag, which opens a page containing a list of options for users to set on a more granular level.
If you added an unsubscribe module to a template, SG Widget makes it easy to control what is displayed on the preferences page. In the Unsubscribe Settings section of your widget, just check the groups you want to be displayed. These will be passed to Sendgrid in an API call when someone subscribes to your list.
When a user clicks the Preferences link in an email they will see a Sendgrid hosted page like this:
How to reduce unsubscribes
While it is important to have a clean unsubscribe process, it would be great if it wasn’t used all that much by your users as nobody wants to see a subscriber leaving their list after you've successfully collected the email. Here are a few proven methods to reduce your unsubscribe rate: .
- Segment Your List by understanding where subscribers came from
- Send good content
- Be consistent with your email frequency
- Get the timing right
- Make sure it renders correctly on all devices
- Implement Double Opt-In. It’s really easy with SG Widget!
Conclusion
Unsubscribe links need to be in every email you send. This guide shows you exactly how to insert unsubscribe links with Sendgrid and the options you have when doing so.
Unless you have a valid reason to use global unsubscribes, we strongly recommend that you insert Group unsubscribe links your emails. Both of these options are possible with SG Widget and they can be configured easily so you can meet the GDPR requirements and ensure that every email you send is a compliant one.
Do you have an opinion on global vs group unsubscribes or are you struggling to implement Sendgrid Unsubscribe Links in your emails? We would love to hear from you so post your thoughts in the comment section below.
Establishing exactly how users joined your Sendgrid list and when allows you to segment better and see which marketing channels are performing best. We realize the value of knowing your customer so we’ve made this very easy to do in SG Widget.
How
It is made possible by our Custom Fields feature that integrates directly with Sendgrid Custom fields.
Here’s how to make it work:
- Create a custom field in Sendgrid called joined_from
- Go back to SG Widget
-
In the edit page of a widget create a corresponding custom field with the following attributes:
name: joined_from (the dropdown is autofilled with your Sendgrid custom fields)
type: hidden
 Screenshot of what your custom field should look like
- Click Update
- Copy the newly generated HTML into your website code
- Set the value of the hidden field with Javascript by targeting the field ID.
Here is a snippet of Javascript ready to use on your site:
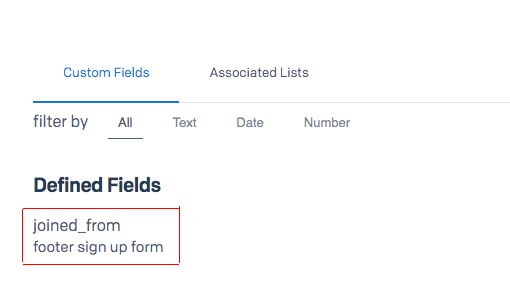
document.getElementById("sg_custom_0").value = "footer sign up form";Remember to customise the ID and value to suit!
Now when a user subscribes from this widget, their record in Sendgrid will have a custom field that shows where they signed up from. Here is what you will see in Sendgrid:
Simple.
Benefits
There are many benefits of recording where your users subscribed from.
Segment List
It is unlikely that all users on your list want to receive the same emails.
You could have a website in multiple languages. It would be a terrible user experience if a user subscribed from the Spanish version of your site and received a Welcome email in English. They would be more likely to unsubscribe than try to read the content. Using a hidden custom field with a value of English Version or Spanish Version will tell you where users subscribed from and what the appropriate email to send them is.
Similarly, a clothing website may have sections for men and women. Male subscribers probably don't want to receive updates about new women's clothing ranges. Setting a custom field with the value of Mens or Women's allows you to send the right email to the right audience in the future. You can then leverage SG Widget's custom email templates to offer more targeted emails to each audience
Segmentation is an entire topic on its own and this is just a brief overview but SG Widget makes it easy to segment SG Widget subscribers from the rest on your list.
Consolidate lists
By recording where users subscribed from you can consolidate your lists. In the examples above, website owners would have needed to create multiple Sendgrid lists for each audience to know where users joined from. Storing the subscribe location with SG Widget Custom Fields bypasses this problem and allows you to avoid an unnecessary number of lists.
See Which Marketing Channels Are Performing Best
It is important to know which marketing channels are performing better than others so you can optimize them. Imagine you have a subscription widget on a wordpress site, are running an email collection campaign via Social Media and also running PPC ads that open a page with an SG Widget instance. It helps to have exact numbers on how many signups each channel is driving. SG Widget will allow you to see exactly how many users are coming from the PPC campaign so you can change your bidding accordingly.
See Which Widgets Are Performing Best
You may have multiple widgets that all connect to the same list. You could place a widget in the footer of your website, another embedded in the middle of a blog post with the third appearing in a popup on the homepage. Giving each instance a Custom Field value of SG Widget Footer, SG Widget Blog, SG Widget Homepage Splash will provide insight into exactly how many subscribers are signing up from each instance and allow you to analyze the conversion rates of each.
Taking things further
Those are just some of the basic use cases of recording where users subscribed from but there are more advanced options open to you.
A/B Test Sign Up Methods
There are many ways to show a signup form and different audiences respond in different ways. You could have one Widget that appears in a popup takeover and a second that slides in from the side in a less intrusive manner. Setting Custom Field values of SG Widget Popup and SG Widget Slide In will provide hard data on which method works best for your audience.
A/B Test Opt-in Types
There are a various Opt-in methods that can be applied to a sign up process. We strongly recommend Double Opt In and support it as a feature of SG Widget but some users may find this doesn’t work for their audience. You could have one widget that sends users through a Single Opt In process and a second that sends them through Double Opt In. A custom field will allow you to categorize these users in your lists and measure which method your audience responds best to.
A/B Test Content
If you have a separate widget instance on a couple of blog posts with Custom Field values of SG Widget Blog Post Video and SG Widget Blog Post Tutorial, you can see which content type generates more signups and performs better.
Finishing Up
When collecting email addresses for your Sendgrid lists, it's important to understand where those subscribers are coming from so you can know your customer, segment and analyse marketing channel effectiveness. You can take things further by A/B testing content types and signup methods. The best thing is that the data is hidden from users so their signup experience is not interrupted or inhibited in any way.
All of this is made possible by SG Widget’s Hidden Custom Fields, which is a feature we built on the back of a user request. If you have a feature you would like to see in SG Widget or anything that would make you Sendgrid experience better, let us know in the comments below.

.jpg)
 Adding Sendgrid Unsubscribe Links to emails
Kleaver 08.20.2024
When someone does a global unsubscribe, can that be reverted?
SG Widget Support 08.20.2024
Yes. That is possible in your Sendgrid account. There is a list of global unsubscribes and if you remove an address from this, that email will be able to receive communications again. However, be careful as it should only be done with the users consent.